Wednesday, October 31, 2012

Spicy Hot Chocolate and a Happy Halloween- Post 22

We have made it to the last day of Vegan MoFo. It has been a wonderful month filled with food and laughter. There is always a feeling of sadness when it ends because I miss the daily posts of awesome food and stories. I hope to do a better job this year in keeping up with blogs. After my rough start this year, I had not been much into blogging. MoFo has renewed my spirits and I am back! 

I love that MoFo is during the month of October. It is my favorite month because it is the start of Autumn, the leaves are changing, seasonal rain, spooky decorations, sweaters, corduroys, and HALLOWEEN! Ollie has made an appearance in his Halloween outfit to say hello and "Happy Halloween!" to you MoFo'ers! It is too bad I only had my phone handy when he posed so sweetly, I would have loved to have my camera out so I could get a better quality photo. Either way, you can see how darn cute he is. His grandma and grandpa Newman got him this cute shirt. 


Ollie has to stay warm as the weather gets cooler so, he will don this shirt even after the festivities today. I also have to stay warm and hot chocolate usually does that trick for me as I get cozy under my snuggie and read a book, watch TV, or use the computer. In the past you have seen Mint Hot Chocolate, Peanut Butter Hot Chocolate, and today I bring you Spicy Hot Chocolate. 


This drink was inspired by a spicy chocolate drink I had at Escazu in downtown Raleigh. This drink has a nice level of spiciness. The interesting note is that the spice does not hit the front of your tongue, but the back towards your throat. Like the peanut butter hot chocolate I made, this one was also created in the Vitamix. Do not worry if you do not have a Vitamix or other high powered blender, you could heat the milk on the stove or in the microwave. It will not be frothy, but it will be just as delicious!

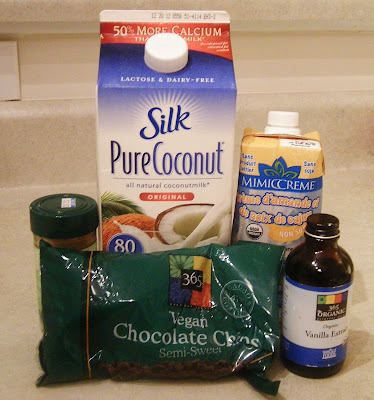
Spicy Hot Chocolate

  • 1 cup of almond, soy, rice or coconut milk
  • 2 tbsp mimic creme 
  • 1 tsp vanilla extract
  • 3 1/2 tbsp vegan chocolate chips
  • 1/8 to 1/4 tsp of cayenne pepper (start out slow and then increase the amount)
Place all of the ingredients into the Vitamix, or high powered blender, and blend for 4 minutes or until steam comes out of the top of the lid. Check for desired heat level and blend more or pour into a mug and enjoy! 

Tuesday, October 30, 2012

Chocolate Peanut Butter Brownies - Post 21

Hello my lucky MoFo friends! Yesterday I said that I might have another post and I DO! Not only is it another post, it is a post about a favorite combination- chocolate and peanut butter. This one of my favorite combinations and based on your comments, it seems to your favorites too.
  
Vegan chocolate chips and butter in a double boiler. It could be heaven


One of the hardest things for me about gluten free has been missing baked goods. There are area bakeries and stores that carry vegan baked goods, but those baked goods are not gluten free. There are also places that carry gluten free baked goods, but they are not vegan. So, you can see my dilemma! In the past year or so a gluten free, vegan bakery named ZenCat has been opened and the baked goods are amazing. Unfortunately, they are in Greensboro and are not always easily available in Durham. When they are, I order up a storm! On the occasions when they are not in town, I have had to take matters into my own hands and make what I want. 

This is the melted product. I was very tempted to eat is straight
I was excited when my Mom came across a gluten free recipe in the newspaper for chocolate peanut butter brownies. The recipe was not vegan, but I knew I could easily veganize it and and in the process make it better than the original. Feeling ambitious, I made the brownies for a potluck with two of my favorite couples. As they were baking, I didn't think that they were going to taste good and I considered throwing them away and making something else. In the end, I decided to follow through with my plan and serve the brownies. The result was delicious! Our guests thought so too!

They are not pretty, but they were delicious!
I am not the best photographer by any means, but these photos are lacking even from my normal mediocre. The photos do not do these brownies justice. If you can, please ignore the quality of the photos and consider the deliciousness of the ingredients. And beware, it is easy to overcook these brownies as they stay moist when cooking. I have been unable to do the test where you stick a toothpick in and it comes out clean and have over cooked them until they hard as bricks. Start with 30 minutes and if you feel nervous cook a couple minutes more. Then remove them from the oven and let cool before digging in.

Since the recipe was changed so significantly, I think it is safe to call it my own.

Gluten-Free Chocolate-Peanut Butter Brownies
  • Olive oil spray for pan
  • 1/2 cup (1 stick) of vegan, gluten free margarine
  • 3/4 cup of vegan, gf chocolate chips
  • 1/3 cup of oat flour
  • 1/3 cup sweet brown rice flour
  • 1 tsp xantham gum
  • 1 tsp baking powder
  • 1/2 tsp salt
  • 1 cup sugar
  • 1 egg replacement (I used Enr-G egg replacer)
  • 1 tsp vanilla extract
  • 1/3 cup natural peanut butter, heated in microwave for 30 seconds to soften
Preheat oven to 350. Spray an 8or 9 inch pan with spray. Set a pot of water over medium heat in a double boiler and bring to a gentle boil. Place the butter and chocolate chips in the top of the double boiler and melt, stirring with a spatula until melted. Remove from heat and let cool.

Sift oat flour, rice flour, and xantham gum into a large bowl. Stir in baking powder and salt. Whisk sugar into chocolate mixture. Whisk in egg replacer and vanilla, stir in dry ingredients until mixture is just combined.

Peanut butter dolloped over batter
Pour batter into prepared pan. Dallop the peanut butter all over the top of the batter and then swirl gently. Bake 25-30 minutes. Let cool before slicing.
Close up of the finished product. It was delicious despite how ugly they look


WARNING: It is hard not to eat the whole pan at once!

Monday, October 29, 2012

Chocolate Cinnamon Scones- Post 20

Today marks my 20th post for Vegan MoFo. I have met my goal to post 20 blogs during the month of October. If you are lucky, you might even get more than 20 posts. I think you could be lucky.

I have been cooking and reading other MoFo blogs this whole month. I have been listening to vlogs, drooling over gluten free and glutenous confections, dreaming about savory entrees and sides, and enjoying all of the pumpkin and Halloween themes. This has been a highlight of my day each day. It is a nice way to escape. 

In talking about MoFo so much, I must have inspired John because he decided that he wanted to contribute. He found a gluten free scone recipe, purchased the ingredients, and made me chocolate cinnamon scones. I am very grateful for his delicious contribution. John and I share meal preparation, but I tend to do the baking and making of sweets. So, it was a nice surprise when John showed an interested in trying baking. Since knowing him, I can only think of one other occasion that he baked something.


Let me say, I think he has talent (and yes, this is an attempt to get him to bake more!). He knows how much I love scones and how I miss them in my life. There is something about a scone that makes it so much more appealing to me than other confections. I think part of it has to do with our study abroad adventure in Scotland during our undergraduate years. One of my favorite memories, is sitting in a cafe in Stirling, Scotland enjoying a scone and a cup of tea. 


The recipe is not ours to share, but I can tell you that it included soy yogurt, gluten free flour blend, chocolate chips, and cinnamon. I can also tell you that it is just as good, if not better, than any scone I remember from previous years. A big thank you to John-I cannot wait to see what else you bake! ;-)

Thursday, October 25, 2012

Peanut Butter Hot Chocolate- Post 19

Yes, you read the title right peanut butter hot chocolate. I was recently introduced to this heavenly treat at a local chocolate shop called Escazu. They make their own chocolate bars, truffles, and have a hot chocolate menu. It is pretty much heaven that chocolate shop. Most of their bars are vegan and many of their truffles are as well. If that is not enough, they offer soy or rice milk for their hot chocolate menu. That divine menu includes delights like chili hot chocolate and peanut butter hot chocolate. 

After having their chocolate bars, I decided that it was time to visit the shop in person. I went one evening with my family and when I saw the hot chocolate menu, I had to have the peanut butter hot chocolate. My mother got the chili hot chocolate and that was heaven in a mug, but I preferred the peanut butter hot chocolate. With each sip, I tasted the rich chocolate and peanuts. The drink was frothy, warm, and filling. 

The shop is in downtown Raleigh and I live in Durham and it is too far to drive there on a regular basis. I had a task ahead of recreating this if I wanted this treat regularly. I noticed that when they were making it, they steamed the soy milk. I do not want to pull out the espresso machine to froth the milk each time, so I decided to try an experiment. Enter the Vitamix!

The Vitamix stays on our counter all of the time because we drink smoothies every morning. After several times experimenting, I came up with a recipe that tastes very close to the original. The only difference is that I have not used a chocolate bar from Escazu. Do not worry, I plan on trying that soon! If you do not have a Vitamix or a high powered blender that has the ability to warm liquids, warm the milk on the stove and froth it with a hand beater or an espresso machine. You can, of course, also have this treat un-frothed.  


Peanut Butter Hot Chocolate

  • 1 cup of almond, soy, rice or coconut milk
  • 2 tbsp mimic creme 
  • 1 tsp vanilla extract
  • 3 1/2 tbsp vegan chocolate chips
  • 3 1/2 tbsp natural peanut butter (my tablespoons were not rounded, so feel free to go over this amount)
Place all of the ingredients into the Vitamix, or high powered blender, and blend for 4 minutes or until steam comes out of the top of the lid. Check for desired heat level and blend more or pour into a mug and enjoy! 

Wednesday, October 24, 2012

Quinoa Bowl- Post 18

In continuing with my semi-theme of CSA ingredients, my blog today is regarding a bowl containing several ingredients from our share. Bowls are a great way to use what you already have and turn it into something delicious, nutritious, warm, and filling. Many different ingredients can come together to create a soul satisfying dinner.  I recently became interested in bowls after two trips earlier this year. One was to Palm Springs, CA and the other was to New York City. During several of my visits to vegan or vegan-friendly restaurants, I ordered a quinoa or rice bowl. One of the tasty bowls I ordered had sweet potato, tempeh, and sauerkraut. 


We recently received senpasai in our share and I was very interested in trying this green. I had never tasted it before, but figured that it could be cooked like other greens- steamed or sauteed. In reading about it online, I found out that it is related to cabbage and is Japanese in origin. The taste is sort of a softer version of bok choi. The leaves are not as dense or chewy, nor is the green as dark as bok choi. I tasted the green both raw and cooked and felt that it could be consumed either way. On this particular night, however, I decided to steam it. 


Another ingredient that we received, and have been receiving, are red peppers. They are more rich and sweet than any pepper I have ever purchased in a grocery store. The peppers are just heavenly raw and many times we snack on the peppers. 

In addition to the greens and peppers, we had a can of salt free pinto beans, organic broccoli, ginger from our farmers market, and organic quinoa from the bulk bin at a local natural foods store. The greens, broccoli, peppers, and ginger were steamed for several minutes on the stove and placed over the cooked quinoa. The pinto beans were warmed in the microwave and placed in the same bowl. We modified a peanut lime sauce from Appetite for Reduction to put over the top. The dressing contains peanuts, peanut butter, lime juice, shallots, tamari, and ginger. 

The combination of all of the ingredients was so fulfilling. After eating this meal, I was satisfied. After dinner, I often dream of going into the kitchen for chocolate or some other sweet or snack. On this occasion, I was kept full all evening and went to bed without indulging in something that I would feel guilty for consuming. 

Tuesday, October 23, 2012

Peanut Butter Cookie Heaven - Post 17

One of my favorite cookies from childhood were peanut butter cookies with the hershey's kiss in the center. I used to enjoy eating them when they were warm from the oven, right after the kiss was pushed in and it had a chance to melt. The cookies were always so rich in peanut butter and the mix with the chocolate made them a favorite treat of mine. Like many people, chocolate and peanut butter among my favorite sweet combinations. 

When fall arrives, I begin thinking of these cookies. I am not sure why I have an association of these cookies with fall. Maybe I ate them at Halloween parties or after school started. Whatever the reason, they usually pop into my head. Since I cannot go out and buy hershey's kisses any longer as they are not vegan, and from what I remember they were not that good, I decided to try a different route. Dark chocolate, or semi sweet, vegan chocolate chips proved to be a great substitute for the kiss. 


The recipe below makes about 20 to 25 small cookies. This recipe can be easily doubled to make more. For the peanut butter, the only ingredient is peanuts as I purchase it in bulk and grind it at the store. I have not tried this recipe from peanut butter purchased in a jar, but would be interested to know if anyone tries them with jarred peanut butter. 

Peanut Butter Chocolate Cookies
  • 1 c creamy peanut butter
  • 3/4 c vegan sugar plus extra for rolling the cookies
  • 1/4 tsp salt
  • Egg replacer for one egg
  • 1 tsp baking powder
  • 1 tsp vanilla
  • 1/4 c vegan chocolate chips (make sure they don't have malted barley as it isn't GF)
Set the oven to 350. Line 2 baking sheets with parchment paper or silicon baking liners. In a large mixing bowl mix the peanut butter, salt, and 3/4 c sugar. Blend. Add egg replacer, baking powder, and vanilla- stir well. Place 1 tbs of dough in your hand and flatten, place several chips in the center and roll the dough into a ball so that the chips are in the center. Roll the ball of dough into the sugar and place on baking sheet. Repeat with the remainder of the dough. 


Using a fork and flatten the cookie then rotate the fork 90 degrees and make another indent in the cookies. Bake cookies for 10 minutes. Remove from oven and let cool on the baking sheets for a couple of minutes and then transfer to a wire rack to finish cooling.


Enjoy warm or cooled!

Monday, October 22, 2012

Bull City Vegan Brunch Challenge Continued- Post 16

As I mentioned in a previous post, Durham is having a vegan brunch challenge for the month of October. I have been supporting the restaurants that have a vegan option that is also gluten free. The challenge has six participating restaurants and three offer gluten free options. 
 
This past weekend we went to Bull Street Market and Gourmet. To be honest, I have been most excited about this restaurant as they showed creativity in the two participating dishes.  For one dish they offered Tofu Hash consisting of white and sweet potato, rosemary, green beans, and a red pepper and tomato sauce. The other dish was potato, corn, and peanut cakes with a coconut and onion "cream and green beans. 
Photo courtesy of the Bull City Vegan Challenge Volunteers

John and I met a friend for breakfast before the farmers market. While eating, we ran into other friends. It was a nice morning of sun, conversation, local coffee and delicious food! John and I enjoyed both dishes, but we each had a favorite. Interestingly, we had different favorites. Mine was the tofu hash and John's was the potato, corn, and peanut cakes. 


Photo courtesy of the Bull City Vegan Challenge Volunteers
Even though I had a favorite, I would gladly eat either dish for breakfast or brunch. They were a delicious start to a beautiful day! After the market, we spent the remainder of the day in the yard working. 

On Sunday, we ended up at The Refectory with my parents and as luck would have it, I forgot to take a picture of the tofu taco scramble AGAIN. I do not want to to have to guess about this dish, so I am posting a photo that someone else had taken (to be honest, all of these pictures are from the BCVC Facebook page as my photos were not acceptable to post). The dish was even better this time around as I was able to get the homemade salsa to go on top. As a follow up to the meal, I had the vegan gluten free chocolate chip cookie. It was a nice ending to a filling lunch. 

Photo courtesy of the Bull City Vegan Challenge Volunteers

My wish is that all of the participating restaurants will keep their dishes indefinitely.  I have never been one to dine out for brunch, but if these options stay around I might reconsider.

Friday, October 19, 2012

Kale and Tahini Sandwiches- Post 15

I used to love to go out and get a sandwich or a sub. When traveling, I would often stop at Subway and get a vegan sub. They were not spectacular, but they were satisfying. I was also delighted with any place that could make a good vegan sandwich. When I got the gluten free news, I realized that sandwiches would no longer be on my plate when going out. Every once and a while I come across a place that has xgfx bread, but it is not that often. 


Therefore, I take matters into my own hands. John and I have an array of sandwiches, but up there on the list are tempeh or tofu ruebans and a kale and sauerkraut sandwich that we found in the Vegan Vittles cookbook. I recently made fermented pickles and I wanted to try them in a sandwich, so I decided to take the kale and kraut idea and make it a kale and pickle sandwich. I wanted to use my freshly fermented cucumbers for more than snacking right from the jar. 


There is not much of a recipe here, but I will share the main ingredients. Here they are: steamed kale, pickles, tahini, grain mustard, gluten free bread, olive oil spray. I put the tahini on one piece of break and the mustard on the other, then the kale and pickles in between and then spray the bread and toast. 

There you have it a kale, pickle, tahini, mustard sandwich. You might think it sounds odd, but I can promise you that it is DELICIOUS!!

Thursday, October 18, 2012

Pantry Clean Out-Taco Casserole- Post 14

As I mentioned before, John and I plan all of our dinners. We sit down each Sunday morning and come up with a list of dinners for the week, and in that planning we make sure to have enough food for leftovers the next day. Once we have planned meals, we make a grocery list and go shopping. We have been married for seven years and have not once failed to do this, even when we are busy and stressed. Before we got married, we shared our plans with friends and family and we received snickers, laughs, and tisks. We heard "You live in a dream world, you won't be able to maintain that." People said the same thing to me about becoming a vegetarian when I was 14. Now I am 32 and am vegan. The moral of the story is that when I say I am going to do something, I do it. I do not do things half way.  

Every once and a while, we go through the pantry and refrigerator and decide to have a meal using up what we have. This particular day we had pinto beans, taco shells, onions, bell peppers from our CSA, a pepper from our garden, cilantro, salsa, tomatoes, and vegan cheese. We first thought that we would have tacos and salad and then I decided to go for something more exciting.   I wanted a taco casserole. 


I threw together the ingredients and came up with a dish that we both loved and will most definitely have again! You can change up the ingredients to what you have in your pantry and fridge!


Pantry Clean Out Taco Casserole
  • 1/2 onion, chopped
  • 1 bell pepper, chopped
  • 1 hot pepper like a jalapeno (or mild if you prefer), chopped
  • 1 15 oz can of beans- we used salt free, organic pinto- drained and rinsed
  • 1 15 oz can of diced tomatoes, salt free
  • 1/2 cup low salt, organic salsa
  • 1 tbsp of taco seasoning- cumin, chili powder, garlic, and onion powder
  • 1/2 package of organic corn hard taco shells, broken in half
  • 1 fresh diced tomato
  • 1 cup vegan cheese
  • 1/4 c cilantro
  • 3 scallions chopped
Heat a large skillet over medium heat, add a tablespoon of water. When hot add the onions and saute 5 minutes. Then add the peppers and saute 3 minutes more. Then add in the beans, tomatoes, salsa, and seasoning. Let the mixture cook until warm a couple of minutes. Remove from heat and set aside. 

Pre heat the oven to 375 degrees. In a casserole dish place half of the broken taco shells, top with half of the bean mixture and half of the vegan cheese. Place the remaining taco shells on top and repeat with the rest of the bean mixture and cheese. Please in the oven for 20 minutes. Sprinkle on the tomato and scallions and place back in the over for 5 minutes. Remove from the over, sprinkle with cilantro and serve. 

Wednesday, October 17, 2012

Rawktowber - Post 13

The title of this blog is a little deceiving. I have not spent this month eating only raw and posting raw recipes. I have only made a couple of things this month that are raw, but several months ago I tried a week of all raw eating. Almost anyone who has eaten raw will tell you they feel better, on the inside and out. Raw food, if done right, is packed full of nutrients, minerals, and protein. And yes, I did say protein. Organic food it its natural state is amazing and satisfying. I also spent less time in the kitchen when I made raw food as most of my work was prep. No time spent over the stove or peeking in the oven. I do not plan on going 100% raw, but I would like to incorporate more of it into my daily meals.

In effort learn more about raw food prep, I took a class taught by Triangle Raw Foods with two friends. They are an amazing local company that has a raw food truck and delivery service that is mostly vegan. Their food is rich, heavenly, and 100% gluten free. They also have monthly tasting parties in which they serve up a sampling of their best dishes. Included in that are some of the best desserts I have ever had! And yes, I am comparing them to cooked vegan and non-vegan desserts. They make the most heavenly creations! 

This photo is courtesy of Triangle Raw foods.
The night of our class we made tacos and sour cream served in a lettuce cup. The tacos were made from pumpkin seeds, carrots, walnuts, spices, and tamari. The sour cream was made from cashews. We placed the two mixtures in a romaine lettuce leaf and topped it with guacamole and salsa. The meal was delicious and it inspired me to make it at home. The difference is that I made them into a raw burrito. We purchased greens at the farmers market and it was a green that was new to me and I did not right down the name. The farmer said that it was similar to collards, but not bitter. To make the green more pliable, I soaked it in water, salt, and lime juice for an hour. Then I filled it with the taco filling, tomato, and sour cream. 

Raw taco with cashew sour cream
The result was a delicious fulfilling dish! Thanks to Triangle Raw Foods for the informative and fun class. If you live in the area, you should look for their food truck and/or order them online!

Tuesday, October 16, 2012

Tempeh Bacon Twice Baked Potatoes - Post 12

As the weather gets cooler, I crave hardier foods. Heavy soups, potato dishes, stews, root vegetables, and the like. During this time I am often reminded of the twice baked potatoes that my Mom would make when I was a child. It felt big enough to be a meal in itself and for me the potato was a vessel for my favorite hot sauces. (For those of you who do not know, I am a hot sauce fanatic and have been since I was a child) 

Years ago I used to buy vegan bacon and make this classic, but after going gluten free I was unable to find a bacon substitute. After making so many versions of tempeh bacon, it finally dawned on me that I could use it in a baked potato. I am not sure what took me so long to make this realization, but I am glad it came to me. 


Feel free to remake this with any of your favorites like broccoli and vegan sour cream or whatever else suites you. To me a twice baked potato is fun and can be different every time. The only word of caution is to cook your potato long enough. I usually get so impatient when I bake potatoes in the over and sometimes have to throw them in the microwave to finish the cooking. 


Tempeh Bacon Twice Baked Potatoes
  • 4 large organic baking potatoes, scrubbed clean, skin still on
  • 1/4 to 1/3 cup of soy, almond, or coconut milk
  • 1 tbsp vegan butter
  • 1/2 tsp chili powder
  • 1/4 tsp garlic powder
  • 1/4 tsp onion powder
  • 1 cup vegan cheese
  • 2 scallions, chopped small
  • black pepper
  • 1 recipe of tempeh bacon (see below)
Set your oven to 425 degrees. Take each potato and using a fork pierce each potato several times. Then wrap each individual potato in tin foil and set on a baking sheet, or place directly on the oven rack.  Bake for an hour or so until the potato is fully baked and soft on the inside. When finished baking remove from the oven and let cool until it is able to be handled. 

Slice off the top half inch of the potato and scoop out the insides into a bowl. Make sure that you leave a wall on the inside of the potato as it will be stuffed again. Mash the insides of the potato with the soy milk and vegan butter. Add in the powders and mash until incorporated. With a spoon mix in 3/4 cup of the cheese, the scallions, black pepper, and tempeh bacon. 

Fill each potato with the mixture, packing tightly. The mixture will need to overflow a bit and be rounded at the top. Sprinkle the remaining 1/4 cup of vegan cheese. Place the potatoes in a baking pan and place back into the oven and bake for an additional 25 minutes. 


Tempeh Bacon:
  • 1 package of tempeh (make sure it is gluten free)
  • 1 1/2 tbsp molasses
  • 1 tbsp liquid smoke
  • 2 tsp gluten free tamari 

Slice the tempeh in half to make two rectangles. Then thinly slice the rectangles to make tempeh slabs. Cut the slabs into strips. In the bottom of a baking dish mix the molasses, liquid smoke, and tamari. Dip both sides of the slices into the mixture to coat. Place in the oven with the potatoes that are baking and bake for 15 to 20 minutes turning once. Make sure that the tempeh does not dry out.

Monday, October 15, 2012

Bull City Vegan Brunch Challenge- Post 11

For the month of October, Durham (the city I live in) is having a vegan brunch challenge. Six local restaurants have been offering vegan options on their brunch menus for the entire month. Each place must offer a sweet and a savory option and cannot do something mundane like oatmeal. 

I was ecstatic when I learned that three of the places were offering gluten free dishes. Those places are The Refractory, Daisy Cakes, and Bull Street Gourmet and Market. Those restaurants are offering tofu scrambles, cookies, cupcakes, tofu and sweet potato hash with green beans and red pepper sauce, and peanut-corn-potato cakes with caramelized onions. For the non-gf items there is French toast, bananas foster, and burritos. Everything sounds amazing!


Last weekend we tried The Refractory and had a delicious dal and rice dish along with a tofu scramble with pumpkin seeds and black beans. I regret that I did not take a picture of our dishes. The dishes were both hardy for a chilly fall morning. It was a nice start to a weekend day and kept us full until dinnertime.


This weekend we went to Daisy Cakes and had their North Coast Tofu Scramble that contained roasted veggies, garlic cilantro tofu topped with vegan mozzarella, cilantro, and scallions. We enjoyed this meal with local coffee with soy milk. We both enjoyed the scramble as the predominate vegetables were white potatoes, sweet potatoes, and red bell peppers. The scramble had a nice flavor and they get extra points for having hot sauce. I always eat my scrambles with hot sauce. 

Next weekend we plan on trying Bull Street Gourmet Market and I hope to post the pictures of their TWO gluten free, vegan dishes! Thanks to all of the organizers, restaurants, and chefs

Friday, October 12, 2012

Sweet Potato Greens Continued - Post 10

As I discussed earlier this week, sweet potato greens are new to me. They have been showing up in our CSA share each week since the beginning of September and I have been trying to vary what I do with them. I find it easy to get sick of some foods, unless I add variety. I am not the type of person to eat the same thing each week. I can only repeat foods so many times before I am ready to swear them off for a while. There are a couple of dishes that I think I could eat on a regular basis, but I do not test it because I would hate to get sick of my favorites. Every week is filled with new recipes and creations. I like to look forward to dinner each night and the variety helps keep dinner exciting. 

Back to the sweet potato greens.....while the green looks delicate, it has no trouble standing up to cooking. It also seems to last longer in the refrigerator that other greens. I am still not sure if that is because it is local and fresh picked. The leaf is sturdy, but not tough, and is a like a cross between spinach and kale. 

Since it was like kale, a thought came to me. What if I added it to my favorite raw kale salad that I shared during MoFo last year? It turns out that I had a good idea because the salad was just as delicious as when I make it with just kale. I might even say that the flavor was improved a bit.  The creaminess of the avocado and the smoothness of the sweet potato green really work together. 


As you can see, I did not get a good photo of the updated kale salad, so I am showing the picture from my MoFo post last year. 


Have a great weekend!

Thursday, October 11, 2012

Miso Ginger Green Beans- Post 9


Today is another post about a CSA ingredient--green beans. While green beans are a common vegetable, I have eaten them almost the same way my whole life. My Mom used to make them sauteed with olive oil, garlic, water chestnuts, and a little bit of soy sauce. I have also had them in stir fries or the ever common green bean casserole. 

I prefer them in stir fries or sauteed to casseroles, so I thought I would come up with a new dish to add some excitement to the beans! I thought of my favorite flavors and then put them together. It is not a complicated dish, but it is packed full of flavor.  In addition, your home will have the smell of garlic, olive oil, and ginger and that is always comforting to me!


Miso Ginger Green Beans
  • 1 pound green beans, washed and trimmed
  • 2 tsp olive oil
  • 1 large clove garlic (or two small), grated
  • 1.5 inch thick piece of ginger, skin removed, grated
  • 1 1/2 tbsp miso paste (make sure it is GF and not made from barley)
  • 1 tbsp rice wine vinegar
  • pepper to taste
Heat a skillet with 1 tsp of olive oil and add in half of the grated garlic and half of the grated ginger. Saute for 3 minutes, making sure not to burn the garlic. Add in the miso paste and stir to combine. Let the miso mixture cook for about 3 minutes. Remove the miso mixture from the pan and set aside. 

Place the remaining tsp of olive oil into the pan and add the remaining garlic and ginger. Saute for 3 minutes. Then add the green beans. Cook for 3 minutes and add the rice wine vinegar and pepper. Cook for 1-2 minutes more and add in the miso mixture and stir to coat the beans. When coated, cook until tender. Serve warm.  

Wednesday, October 10, 2012

Abundant Eggplant - Post 8

Eggplant is such a beautiful, deep violet color that I imagine the first people that tried it were expecting something amazing. I wonder if those people were disappointed. When I see eggplant, I want to eat it then I am usually disappointed. I do not dislike the vegetable, I just do not fully appreciate it. I think that it is wonderful breaded and fried, but since I normally do not bread or fry I am often at a loss as to what to do with it. I have made eggplant parmesan vegan and gluten free, but it was not stellar. It is probably because I did not fry the eggplant. I am not the type to fry things. I do not love fried foods. Well, let me clarify--fried foods do not love me.


I have also sliced eggplant thin and oven roasted it and served it in a sandwich with roasted red pepper. I like eggplant that way, but I felt like I needed something new. The way I tend to prefer eggplant is in a Middle Eastern dish called baba ghanoush. For several weeks in a row, we had gotten eggplant in our CSA share and I decided to try the dish again. I had made it years ago and wanted to improve on the flavor. It came to me that the way to up the flavor in this dish would be to roast the garlic along with the eggplant. So I tried an experiment of stuffing the garlic into the eggplant while it was roasting. My thought was that the flavor of the garlic would infuse the eggplant while roasting. The result was a garlicky success. 


I served this as a side dish to tofu and vegetable kabobs with brown rice on the side. As I thought about the flavor of the baba ghanoush, I envisioned it as a delicious pasta sauce as well. I tried the idea recently and was pleased with the result. Unfortunately, I did not take any pictures of it as a pasta sauce. 

Baba Ghanoush
  • 1 large eggplant or 3 small (I used 3 here)
  • 3 cloves garlic, crushed and cut in three slices
  • 3 Tbsp tahini
  • 1 lemon, juiced
  • Olive oil
  • Chili powder
  • Cumin
  • Salt and pepper
  • Sumac (optional)
Preheat the oven to 400 degrees. Wash the eggplant. If using three small eggplants, cut three slits into each. If using one eggplant, cut 9 slits. Make sure that the slits are large enough for the garlic slices. Stuff the garlic slices into the slits and place on a baking sheet sprayed with a small amount of olive oil. Roast the eggplant for 25-35 minutes until tender. 


When finished, remove from the oven and let cool. When cooled, remove the garlic from the eggplant and place into a food processor. Peel the eggplant and scoop out the tender inside into the food processor. Place the tahini and lemon juice in the processor and blend. Stream in olive oil until it has reached a consistency that you prefer. Add the chili powder, cumin, salt and pepper and pulse for a couple of seconds. Taste and add more seasoning, if needed. 

Place into a serving dish and drizzle olive oil in the center. If using, sprinkle with sumac. If you do not have sumac, you can sprinkle with paprika.

Tuesday, October 9, 2012

Vegan Pigs in a Gluten Free Blanket - Post 7

As a child, I would get so excited when my Mom had company over and made party fare. One of the things she would serve was cocktail franks wrapped in dough. She would also make an accompanying dipping sauce. I would always get so excited and would help her make the cocktail franks. When the party started, I would stand near them and gobble them down. I always loved hot dogs as a child. Then I became vegetarian and eventually vegan and I still wanted to eat these as a treat. I would often buy vegan hotdogs and prepackaged biscuit dough and have these as a treat. 

After I became gluten free, I learned that this no longer could be a snack for me. When I stopped feeling sad and sorry for myself, I decided to come up with a recipe. I did not need to go to the store and buy biscuit dough, I could make the dough myself. Then these wonderful wrapped dogs could be a treat again. 


Let me say, what a treat they are! When we have them, we serve them with  oven sweet potato fries and a healthy kale salad. I think that these are even better than the originals ones I had a child. I use flax seeds in the dough as the binder and it gives the dough a pretty speckled look and a rich flavor. I am very happy with the result and plan to cut of the vegan hot dogs into small pieces to serve at our next party. 


Vegan Pigs in a Gluten Free Blanket
  • 2 cups of all-purpose gluten free flour (I used a brand I purchased online, but Bob's Red Mill would work)
  • 1 tsp xantham gum
  • 1/4 cup of tapioca flour
  • 1 tsp baking powder
  • 1 tsp salt
  • 4 tsp of vegan shortening (I used Spectrum organic shortening) 
  • 1 cup almond milk
  • 2 tbsp ground flax seeds
  • 4 tbsp of water
  • Olive oil 
  • 1 package of vegan, gluten free veggie dogs (e.g. Tofu Pups)
Start by making the flax goo eggs. In a small bowl, mix the ground flax seeds with the water and let them sit for about 10 minutes. You will know they are ready when they are gooey. 

In the meantime, mix the all-purpose flour, xantham gum, tapioca flour, baking powder, and salt in a medium bowl. Drop in the shortening and cut in the shortening with a fork. You should see pea size pieces form from the shortening. Add in the almond milk and flax goo eggs and mix until a sticky dough is formed. 

Set the oven to 350 degrees. Place a small amount of olive oil in a small bowl. Remove the veggie dogs from the packaging and set aside. The dough is very sticky so you will need to rub some of the olive oil on your finger tips and palm. Place a veggie dog in your hand and pick up a couple of tablespoons of dough. Form the dough around the dog and roll it in your palm to make the dough cover the dog completely. Patch up any wholes and place the covered dog on a baking sheet. Repeat with the rest of the veggie dogs, making sure to place olive oil on your hand before you roll each one. 


When the dogs are finished, place in the oven for 15-20 minutes until the dough is fully cooked through. Serve warm with ketchup, mustard, BBQ sauce, or your favorite dipping sauce!

Monday, October 8, 2012

Sweet Potato Greens - Post 6


If you are like me, you probably never heard of sweet potato greens before. We have all had sweet potatoes, but who ever thought to eat the greens! These lovelies are in abundance in our Piedmont Biofarm CSA box each week. I love our CSA as they decided to harvest the greens and give them to CSA customers and sell them at their stand at the farmers market. How genius! I do not see these greens at the other stands that sell sweet potatoes.
It is difficult to describe the flavor of these greens as they do not taste like anything I have tried before. The texture of the leaf is soft and smooth and the leaf tastes smooth on your tongue. It does not taste like a sweet potato. While this green does not taste like spinach, it can certainly be used in place of spinach. We have sauteed it, eaten it raw, enjoyed it in smoothies, etc. They are very versatile and full of vitamins! They contain protein, potassium, vitamin A (a TON of it!), folate, just to name a few. 
 You will likely see several posts about the greens as we have a lot to use each week. Below is a picture of gluten free, vegan lasagna I made. I used rice noodles, vegan sauce, I made up a tofu ricotta from the cookbook Vegan Vittles, sweet potato greens, and of course Daiya
If you see these at your local market or grocery store, be sure to give them a try!

Friday, October 5, 2012

Sesame Cabbage - Post 5

Is it just me or do you find that whenever you buy cabbage, there is so much of it that you often have a half of cabbage lying around in your refrigerator? I cannot tell you how many times I have purchased a cabbage for a specific purpose and the recipe only called for half. Therefore, I had a cabbage starring me in the face each time I opened the fridge. It is true that the vegetable will last for weeks because it is a hardy vegetable. However, I hate to have it sit around too long. No one wants cabbage to go bad. Not only is it wasteful, it is putrid. 
I decided to put my fear of spoiled cabbage to rest and I came up with a recipe that would help me combat this fear. I was going for an Asian flavor to go with a rice or noodle dish. On this particular night, I served the cabbage side Pad Thai like dish with cucumbers, bell peppers, tomatoes, cilantro, and peanuts. 
This dish got a thumbs up from both of us. I can see us using this recipe anytime we have an unused cabbage. In fact, I like this recipe enough that I could see using a whole cabbage and doubling the recipe! 

Sesame Cabbage
  • 2 Tbsp + 1 tsp rice vinegar
  • 1 tsp water
  • half of a yellow onion, cut into half moons
  • 1 garlic clove, crushed and chopped
  • half of a purple cabbage, cut into long strips
  • 1 inch of ginger grated
  • 2 carrots, stripped using a vegetable peeler
  • 2 tsp sesame oil
  • 2 tsp sesame seeds
Heat a medium sized skillet with 1 tsp of rice vinegar and 1 tsp of water. When heated, saute onions for 5-7 minutes until tender, adding more water if needed. Once the onion is tender, add in the cabbage and garlic and cook until tender, about 5 minutes. Then add in the carrots and sesame oil. Cook for about two minutes until the carrots are tender. When finished, sprinkle on the sesame seeds and serve warm.